> ## Documentation Index
> Fetch the complete documentation index at: https://docs.salad.com/llms.txt
> Use this file to discover all available pages before exploring further.
> ## Agent Instructions
> For autonomous tasks, use live SaladCloud API responses for current state, availability, quotas, models, and other dynamic values. Use current OpenAPI specifications where provided for paths, schemas, required fields, and enums. Never invent endpoints, fields, prices, availability, quotas, models, or state. Prefer API workflows over Portal steps. Read before changing and never expose credentials, signed media URLs, prompts, or sensitive outputs. Retry only safe or idempotent operations with bounded backoff, honoring Retry-After. Verify every write with a read. Stop rather than repeat an uncertain non-idempotent or billable request. AI Gateway uses an organization-specific Bearer key and live /v1/models discovery. Do not delete, cancel, stop, or reduce capacity without explicit user intent. Bind shared operation IDs to the selected product path. Treat Container Engine instances as interruptible and local state as ephemeral.
# Self-Onboard for Pay-Per-Token AI Gateway
> Create an organization-specific Salad AI Gateway API key and make your first pay-per-token request.
*Last Updated: September 1, 2026*
> Account, organization, credit, and key creation are user-facing Portal actions. Never ask the user to paste a key,
> expose a copied value, or treat the regular SaladCloud API key as an AI Gateway credential. After onboarding, use
> the [AI Gateway request runbook](/agents/ai-gateway/select-model-and-send-request).
Salad AI Gateway is currently in **beta**.
Pay-per-token access is self-service. Each AI Gateway API key belongs to one user and one organization, and usage made
with that key is billed to the organization's credit balance.
## Step 1: Create an Account and Organization
1. [Create a SaladCloud account](https://portal.salad.com) or sign in to your existing account.
2. Create an organization in the portal. If you need help, follow the
[account setup guide](/general/tutorials/account-setup).
3. Open the organization you want to use with Salad AI Gateway.
Gateway access is configured per user, per organization. If you use AI Gateway with more than one organization, create
a separate key for each organization.
## Step 2: Add Credits to the Organization
AI Gateway pay-per-token usage draws from the selected organization's SaladCloud credit balance. In the organization,
select **Billing & Usage** from the left navigation and add credits. The organization must have a positive credit
balance before it can process AI Gateway requests.
See [Billing](/general/explanation/billing) for instructions on adding credits and configuring auto recharge.
## Step 3: Create an AI Gateway API Key
1. Open the organization you want to bill for AI Gateway usage.
2. In the left navigation, select **AI Gateway**.
3. Click **Create API Key for *organization name***.
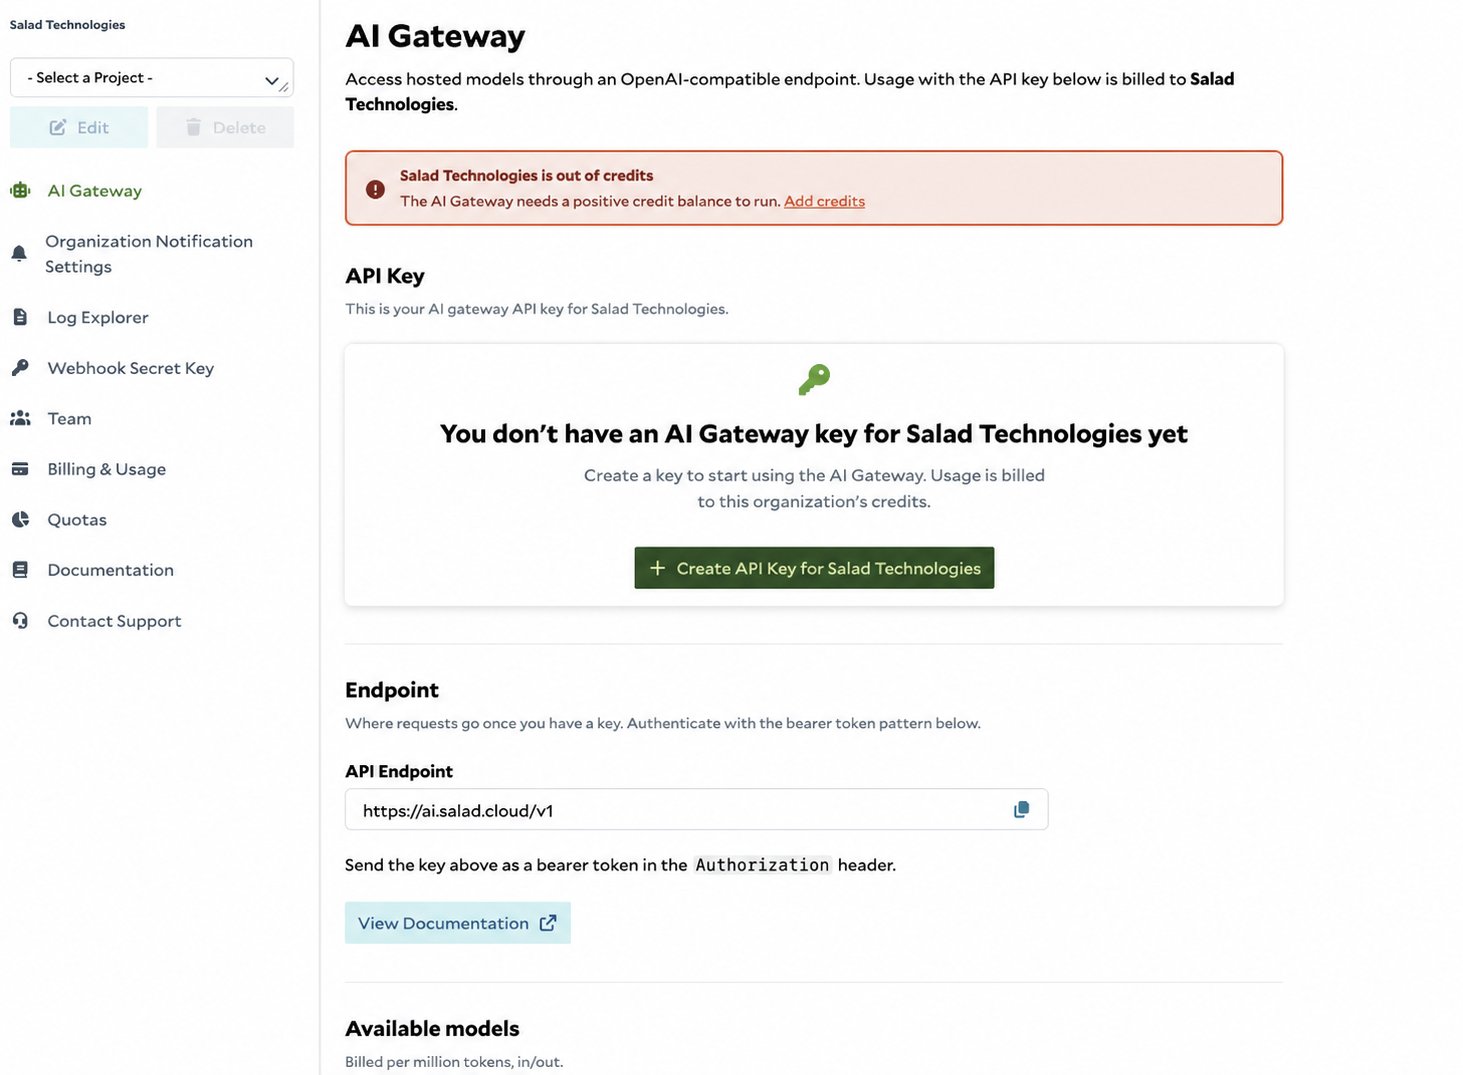 The key is associated with your user and the selected organization. Do not share it with other users.
## Step 4: Retrieve and Copy the Key
1. Select your username in the upper-right corner of the portal.
2. Select **API Access**.
3. Under **AI Gateway Keys**, find the organization you selected.
4. Click the copy icon next to the masked key.
The key is associated with your user and the selected organization. Do not share it with other users.
## Step 4: Retrieve and Copy the Key
1. Select your username in the upper-right corner of the portal.
2. Select **API Access**.
3. Under **AI Gateway Keys**, find the organization you selected.
4. Click the copy icon next to the masked key.
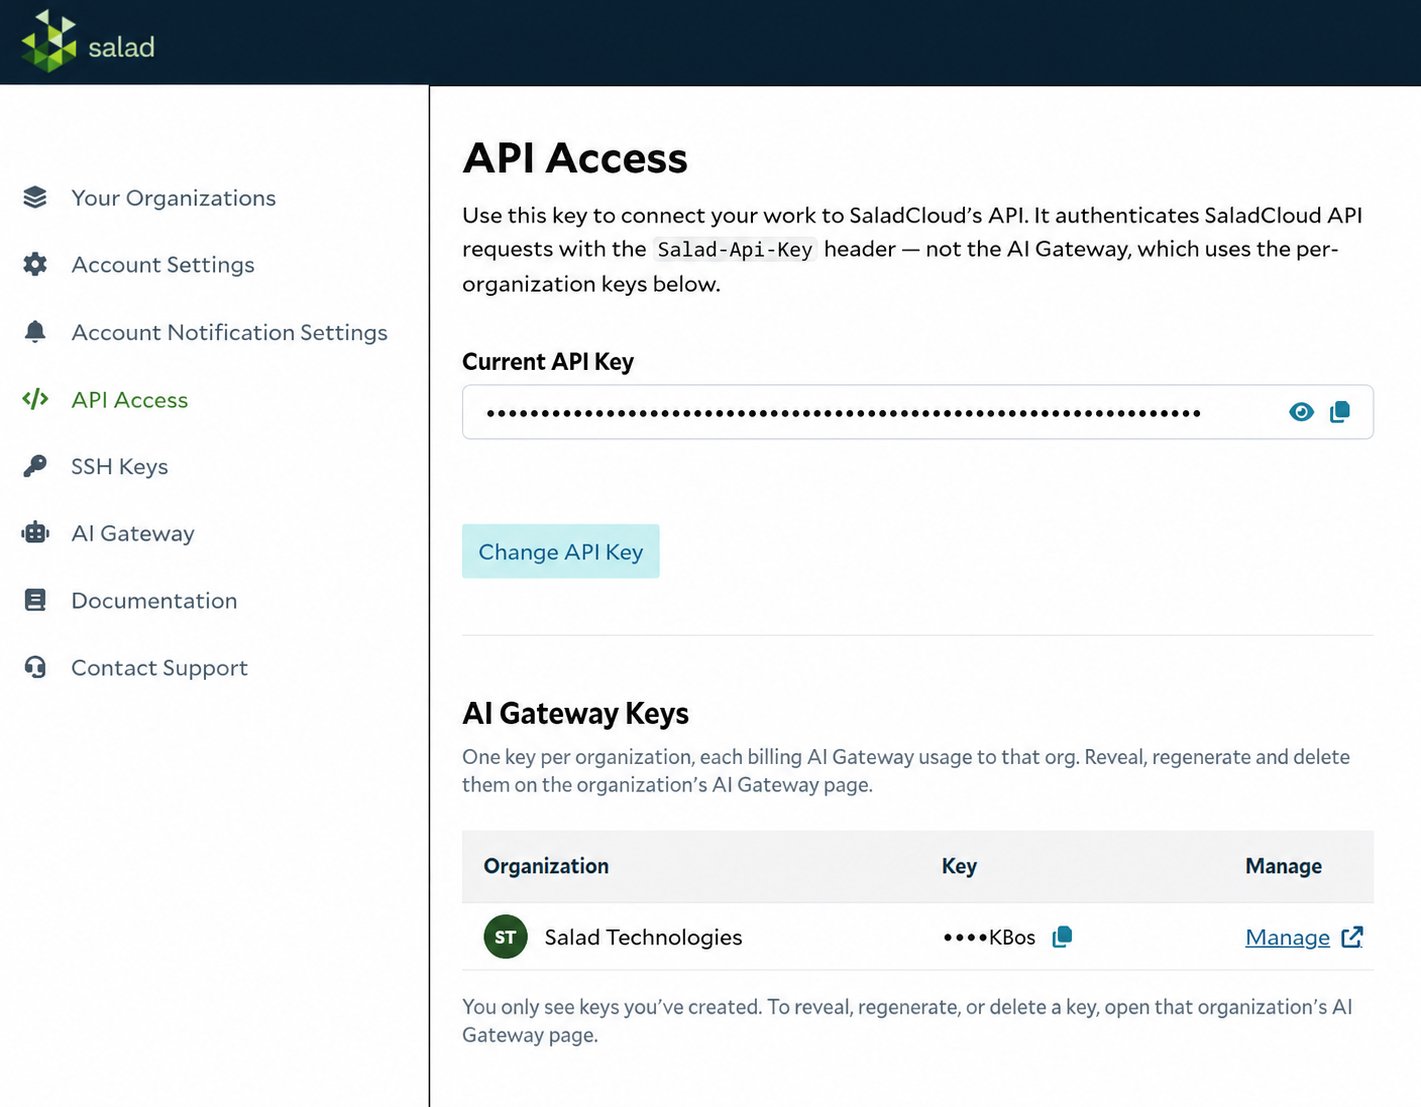 The **Current API Key** at the top of the page authenticates other SaladCloud APIs with the `Salad-Api-Key` header. It
does not authenticate AI Gateway requests. Use the organization-specific key listed under **AI Gateway Keys** as a
Bearer token.
The API Access page shows only AI Gateway keys that you created. To reveal, regenerate, or delete a key, click
**Manage** or return to that organization's **AI Gateway** page.
## Step 5: Store the Key Securely
Store the copied key in an environment variable instead of hardcoding it in your application:
```bash theme={null}
export SALAD_AI_GATEWAY_API_KEY=""
```
Do not commit the key to source control or expose it in client-side code.
## Step 6: Make Your First Request
Send the AI Gateway key as a Bearer token to the OpenAI-compatible endpoint:
```bash theme={null}
curl https://ai.salad.cloud/v1/chat/completions \
-H "Content-Type: application/json" \
-H "Authorization: Bearer $SALAD_AI_GATEWAY_API_KEY" \
-d '{
"model": "qwen3.6-35b-a3b",
"messages": [
{"role": "user", "content": "Say hello in one sentence."}
]
}'
```
You should receive a JSON response containing the model's reply. Input and output tokens are billed to the organization
at the [published pay-per-token rates](/ai-gateway/reference/pricing).
## Next Steps
* Follow the [Getting Started guide](/ai-gateway/tutorials/getting-started) for Python, JavaScript, and streaming
examples.
* Review the [Models reference](/ai-gateway/reference/models) for model IDs and capabilities.
* Browse [AI Gateway integrations](/ai-gateway/integrations/overview) for coding agents, IDEs, and frameworks.
The **Current API Key** at the top of the page authenticates other SaladCloud APIs with the `Salad-Api-Key` header. It
does not authenticate AI Gateway requests. Use the organization-specific key listed under **AI Gateway Keys** as a
Bearer token.
The API Access page shows only AI Gateway keys that you created. To reveal, regenerate, or delete a key, click
**Manage** or return to that organization's **AI Gateway** page.
## Step 5: Store the Key Securely
Store the copied key in an environment variable instead of hardcoding it in your application:
```bash theme={null}
export SALAD_AI_GATEWAY_API_KEY=""
```
Do not commit the key to source control or expose it in client-side code.
## Step 6: Make Your First Request
Send the AI Gateway key as a Bearer token to the OpenAI-compatible endpoint:
```bash theme={null}
curl https://ai.salad.cloud/v1/chat/completions \
-H "Content-Type: application/json" \
-H "Authorization: Bearer $SALAD_AI_GATEWAY_API_KEY" \
-d '{
"model": "qwen3.6-35b-a3b",
"messages": [
{"role": "user", "content": "Say hello in one sentence."}
]
}'
```
You should receive a JSON response containing the model's reply. Input and output tokens are billed to the organization
at the [published pay-per-token rates](/ai-gateway/reference/pricing).
## Next Steps
* Follow the [Getting Started guide](/ai-gateway/tutorials/getting-started) for Python, JavaScript, and streaming
examples.
* Review the [Models reference](/ai-gateway/reference/models) for model IDs and capabilities.
* Browse [AI Gateway integrations](/ai-gateway/integrations/overview) for coding agents, IDEs, and frameworks.