Documentation Index
Fetch the complete documentation index at: https://docs.salad.com/llms.txt
Use this file to discover all available pages before exploring further.
Last Updated: October 10, 2024
Introduction
Text-to-speech (TTS) technology has seen remarkable advancements in recent years, becoming increasingly accessible and
efficient. Contemporary TTS models utilize deep learning and artificial intelligence to generate speech that is both
natural-sounding and highly accurate. These advancements have led to widespread applications in various real-life
scenarios, including voice assistants, audiobook narration, and accessibility tools for individuals with visual
impairments or reading difficulties. In this article, we will explore the capabilities of one such TTS model, MetaVoice,
and demonstrate how to leverage its features on SaladCloud in a cloud-based environment.
If you are looking for fast deployment of MetaVoice Endpoint on SaladCloud move to
Deploying MetaVoice Endpoint to Salad
MetaVoice-1B is a sophisticated text-to-speech (TTS) model with an impressive 1.2 billion parameters, trained on an
extensive dataset of 100,000 hours of speech. It is specifically tailored to produce emotionally rich English speech
rhythms and tones, setting it apart for its accuracy and lifelike voice synthesis.
A notable feature of MetaVoice-1B is its capability for zero-shot voice cloning, which can accurately replicate American
and British voices with just a 30-second audio sample. Additionally, it boasts cross-lingual cloning abilities,
demonstrated with minimal training data, such as one minute for Indian accents. Released under the flexible Apache 2.0
license, MetaVoice-1B is particularly well-suited for long-form synthesis, making it a versatile tool for various
applications.
MetaVoice employs a sophisticated architecture to convert text into natural-sounding speech. Here’s a breakdown of the
process:
- Token Prediction The model predicts EnCodec tokens based on input text and speaker information. These tokens are
then diffused up to the waveform level, with post-processing applied to enhance audio quality.
- Token Generation A causal GPT model is used to predict the first two hierarchies of EnCodec tokens. Both text and
audio are included in the LLM context, while speaker information is incorporated through conditioning at the token
embedding layer. This speaker conditioning is derived from a separate speaker verification network.
- Flattened Interleaved Prediction The two hierarchies are predicted in a “flattened interleaved” manner. This
means the model predicts the first token of the first hierarchy, then the first token of the second hierarchy,
followed by the second token of the first hierarchy, and so on.
- Condition-Free Sampling To enhance the model’s cloning capability, condition-free sampling is employed.
- Tokenization The text is tokenized using a custom-trained BPE tokenizer with 512 tokens. Notably, the model skips
predicting semantic tokens, as this was found to be unnecessary for effective synthesis.
- Non-Causal Transformer A non-causal (encoder-style) transformer is used to predict the remaining six hierarchies
from the first two. This smaller model (~10 million parameters) demonstrates extensive zero-shot generalization to
most speakers tested. Being non-causal, it can predict all timesteps in parallel.
- Multi-Band Diffusion Waveforms are generated from EnCodec tokens using multi-band diffusion. This approach
results in clearer speech compared to traditional methods, although it can introduce background artifacts.
- Artifact Removal DeepFilterNet is utilized to clean up artifacts introduced by multi-band diffusion, ensuring the
final output is clear and pleasant to the ear.
This architecture allows MetaVoice to produce high-quality, natural-sounding speech with effective speaker cloning and
generalization capabilities.
Handling Text Length Limitations in MetaVoice
During our evaluation of MetaVoice, we encountered limitations regarding the maximum length of text the model could
process effectively in one go. Although the default token limit is set to 2048 tokens per batch, we observed that the
model’s performance began to degrade with even smaller numbers of tokens.
To address this issue, we implemented a preprocessing step to divide the text into smaller segments. Specifically, we
found that breaking the text into two-sentence pieces allowed us to stay within the model’s processing capabilities
without compromising the quality of the generated speech.
For sentence tokenization, we utilized the Punkt Sentence Tokenizer, which is a part of the Natural Language Toolkit
(NLTK). This tokenizer is effective in identifying sentence boundaries, making it a suitable choice for segmenting our
text data into manageable pieces for MetaVoice processing.
The official documentation for MetaVoice suggests the use of GPUs with a minimum of 12GB of VRAM to ensure optimal
performance. However, during our trials, we explored the use of GPUs with lower VRAM and found that they could still
deliver satisfactory results. This necessitated a meticulous selection process from SaladCloud’s GPU fleet to identify
compatible options that could handle the processing demands of MetaVoice.
In this project, we aim to deploy a flexible voice solution that enables text-to-speech conversion with addition of a
narrator’s voice tone. This solution will be accessible as an API.
Workflow:
- Request: The process initiates with an API request.
- Input Data: Text files and reference voices are stored on Azure.
- TTS and Voice Cloning: The text file is processed, and an audio file is generated based on the input voice,
following MetaVoice’s architecture.
- Storage and Accessibility: The generated audio file is uploaded back to Azure for easy access and further usage.
Through this project, we aim to demonstrate that advanced voice cloning and text-to-speech synthesis are not only
reserved for large organizations with extensive resources. By leveraging MetaVoice and SaladCloud , we make cutting-edge
voice technology accessible to a wider audience, enabling the creation of realistic and customizable speech with minimal
effort. This initiative showcases how cloud computing and AI models can work together to address real-world applications
in voice synthesis and cloning, offering value in various scenarios such as content creation, accessibility, and
personalized communication.
For average processing prices, refer to our benchmarks:
MetaVoice AI Text-to-Speech (TTS) Benchmark: Narrate 100,000 words for only $4.29 on Salad
Reference Architecture
- Deployment:
- The FastAPI application is containerized using Docker, providing a consistent and isolated environment for
deployment.
- The Docker container is then deployed on SaladCloud’s compute resources to leverage their processing capabilities.
- The Docker image is stored in the SaladCloud Docker Container Registry, ensuring secure and easy access for
deployment and updates.

Folder Structure
Our full solution is stored here: MetaVoice Git Repo
openvoice-on-salad/
├─ src/
│  ├─ infrastructure/
│  │  ├─ main.bicep (azure resources deployment)
│  ├─ python/
│  │  ├─ api /
│  │  │  ├─ inference/
│  │  │  │  ├─ dev/
│  │  │  │  │  ├─ setup
│  │  │  │  ├─ fast.py
│  │  │  │  ├─ setup.py
│  │  │  │  ├─ assets
│  │  │  │  ├─ fam
│  │  │  │  ├─ outputs
│  │  │  ├─ .dockerignore
│  │  │  ├─ Dockerfile
Local Development Setup and Testing
For a smooth customization process, we have made our GitHub
repository public. Begin by setting up an efficient local
development environment. Execute the setup script to install all dependencies and download the MetaVoice checkpoints.
This script ensures that the dependencies function correctly during development. The complete contents of the setup
script are provided below.
The Setup Script:
set -e
echo "setup the curent environment"
CURRENT_DIRECTORY="$( dirname "${BASH_SOURCE[0]}" )"
cd "${CURRENT_DIRECTORY}"
echo "current directory: $( pwd )"
echo "setup development environment"
METAVOICE="$( cd .. && pwd )"
echo "dev directory set to: ${METAVOICE}"
echo "remove old virtual environment"
rm -rf "${METAVOICE}/.venv"
echo "create new virtual environment"
python3.10 -m venv "${METAVOICE}/.venv"
echo "activate virtual environment"
source "${METAVOICE}/.venv/bin/activate"
cd "${METAVOICE}"
# install ffmpeg
echo "installing ffmpeg"
wget https://johnvansickle.com/ffmpeg/builds/ffmpeg-git-amd64-static.tar.xz
wget https://johnvansickle.com/ffmpeg/builds/ffmpeg-git-amd64-static.tar.xz.md5
md5sum -c ffmpeg-git-amd64-static.tar.xz.md5
tar xvf ffmpeg-git-amd64-static.tar.xz
sudo mv ffmpeg-git-*-static/ffprobe ffmpeg-git-*-static/ffmpeg /usr/local/bin/
rm -rf ffmpeg-git-*

# install rust if not installed (ensure you've restarted your terminal after installation)
echo "installing rust"
curl --proto '=https' --tlsv1.2 -sSf https://sh.rustup.rs | sh
source $HOME/.cargo/env
echo "installing dependencies ..."
(cd "${METAVOICE}" && pip install --upgrade pip && pip install -r requirements.txt)
pip install --upgrade torch torchaudio
pip install -e .
import json
import logging
import shlex
import subprocess
import tempfile
import warnings
from pathlib import Path
from typing import Literal, Optional

import fastapi
import fastapi.middleware.cors
import tyro
import uvicorn
from attr import dataclass
from fastapi import Request
from fastapi.responses import Response

from fam.llm.fast_inference import TTS
from fam.llm.utils import check_audio_file

logger = logging.getLogger(__name__)


## Setup FastAPI server.
app = fastapi.FastAPI()


@dataclass
class ServingConfig:
    huggingface_repo_id: str = "metavoiceio/metavoice-1B-v0.1"
    """Absolute path to the model directory."""

    temperature: float = 1.0
    """Temperature for sampling applied to both models."""

    seed: int = 1337
    """Random seed for sampling."""

    port: int = 58003

    quantisation_mode: Optional[Literal["int4", "int8"]] = None


# Singleton
class _GlobalState:
    config: ServingConfig
    tts: TTS


GlobalState = _GlobalState()


@dataclass(frozen=True)
class TTSRequest:
    text: str
    speaker_ref_path: Optional[str] = None
    guidance: float = 3.0
    top_p: float = 0.95
    top_k: Optional[int] = None


@app.get("/health")
async def health_check():
    return {"status": "ok"}


@app.post("/tts", response_class=Response)
async def text_to_speech(req: Request):
    audiodata = await req.body()
    payload = None
    wav_out_path = None

    try:
        headers = req.headers
        payload = headers["X-Payload"]
        payload = json.loads(payload)
        tts_req = TTSRequest(**payload)
        with tempfile.NamedTemporaryFile(suffix=".wav") as wav_tmp:
            if tts_req.speaker_ref_path is None:
                wav_path = _convert_audiodata_to_wav_path(audiodata, wav_tmp)
                check_audio_file(wav_path)
            else:
                # TODO: fix
                wav_path = tts_req.speaker_ref_path

            if wav_path is None:
                warnings.warn("Running without speaker reference")
                assert tts_req.guidance is None

            wav_out_path = GlobalState.tts.synthesise(
                text=tts_req.text,
                spk_ref_path=wav_path,
                top_p=tts_req.top_p,
                guidance_scale=tts_req.guidance,
            )

        with open(wav_out_path, "rb") as f:
            return Response(content=f.read(), media_type="audio/wav")
    except Exception as e:
        # traceback_str = "".join(traceback.format_tb(e.__traceback__))
        logger.exception(f"Error processing request {payload}")
        return Response(
            content="Something went wrong. Please try again in a few mins or contact us on Discord",
            status_code=500,
        )
    finally:
        if wav_out_path is not None:
            Path(wav_out_path).unlink(missing_ok=True)


def _convert_audiodata_to_wav_path(audiodata, wav_tmp):
    with tempfile.NamedTemporaryFile() as unknown_format_tmp:
        if unknown_format_tmp.write(audiodata) == 0:
            return None
        unknown_format_tmp.flush()

        subprocess.check_output(
            # arbitrary 2 minute cutoff
            shlex.split(f"ffmpeg -t 120 -y -i {unknown_format_tmp.name} -f wav {wav_tmp.name}")
        )

        return wav_tmp.name


if __name__ == "__main__":
    for name in logging.root.manager.loggerDict:
        logger = logging.getLogger(name)
        logger.setLevel(logging.INFO)
    logging.root.setLevel(logging.INFO)

    GlobalState.config = tyro.cli(ServingConfig)
    GlobalState.tts = TTS(seed=GlobalState.config.seed, quantisation_mode=GlobalState.config.quantisation_mode)

    app.add_middleware(
        fastapi.middleware.cors.CORSMiddleware,
        allow_origins=["*", f"http://localhost:{GlobalState.config.port}", "http://localhost:3000"],
        allow_credentials=True,
        allow_methods=["*"],
        allow_headers=["*"],
    )
    uvicorn.run(
        app,
        host="0.0.0.0",
        port=GlobalState.config.port,
        log_level="info",
    )
Additional Endpoints
Due to the computational needs of MetaVoice, which requires approximately one second per word to convert text to audio,
we’ve introduced two new endpoints to accommodate different text lengths:
/process_short_text: This endpoint is designed for processing shorter texts where the response time is not a
significant concern. It directly calls the inference function and waits for the processing to complete before returning
the result. This synchronous approach is suitable for texts that can be processed relatively quickly.
@app.post("/process_short_text")
async def process(
    connection_string: str = Query("DefaultEndpointsProtocol=https;AccountName=accountname;AccountKey=key;EndpointSuffix=core.windows.net", description="Azure Storage Connection String"),
    input_container_name: str = Query("requests", description="Container name for input files"),
    output_container_name: str = Query("results", description="Container name for output files"),
    voices_container_name: str = Query("voices", description="Container name for voice files"),
    reference_voice: str = Query(None, description="Voice file to be used as reference"),
    text_file: str = Query(description="Text file to be used for TTS"),
):
    result = inference(connection_string, input_container_name, output_container_name, voices_container_name, reference_voice, text_file)
    return result
@app.post("/process_long_text")
async def process_long(
    background_tasks: BackgroundTasks,
    connection_string: str = Query("DefaultEndpointsProtocol=https;AccountName=accountname;AccountKey=key;EndpointSuffix=core.windows.net", description="Azure Storage Connection String"),
    input_container_name: str = Query("requests", description="Container name for input files"),
    output_container_name: str = Query("results", description="Container name for output files"),
    voices_container_name: str = Query("voices", description="Container name for voice files"),
    reference_voice: str = Query(None, description="Voice file to be used as reference"),
    text_file: str = Query(description="Text file to be used for TTS"),
):
    background_tasks.add_task(inference, connection_string, input_container_name, output_container_name, voices_container_name, reference_voice, text_file)
    return {"status": "Process started"}
Request Arguments
Here’s an explanation of each argument:
connection_string: The Azure Storage connection string, which is used to authenticate and connect to your Azure
Storage account. It typically includes the account name, account key, and endpoint suffix.
input_container_name: The name of the Azure Blob Storage container where the input text files are stored. The API
will fetch the text file from this container for processing.
output_container_name: The name of the Azure Blob Storage container where the resulting audio files will be stored.
The final voice audio file will be uploaded to this container.
voices_container_name: The name of the Azure Blob Storage container where the reference voice files are stored. The
API will fetch the reference voice file from this container.
reference_voice: The name of the reference voice file to be used for voice cloning. The API will attempt to clone
the voice from this file.
text_file: The name of the text file containing the text to be synthesized into speech. The API will read the text
from this file and process it using the MetaVoice model.
When a request is made to this endpoint with the necessary parameters, the API will fetch the text and reference voice
files from Azure Storage, perform voice cloning and text-to-speech synthesis, and upload the resulting audio file back
to Azure Storage. Live response will include the status of the process and the location of the resulting audio file.
Data Preprocessing. Handling Large Text Inputs.
To process larger text inputs with MetaVoice, we need to divide the text into smaller chunks. We chose to split the text
into segments of two sentences each for manageable processing. For this task, we employed the Punkt Sentence Tokenizer
from the Natural Language Toolkit (NLTK). Once the audio for each chunk is processed, we then need to concatenate the
audio files to create the final output.
Here’s a code snippet that demonstrates how to split the text into sentences and combine the resulting audio files:
import nltk
import wave

def split_into_sentences(text):
    nltk.download('punkt')  # Download the Punkt tokenizer.
    return nltk.tokenize.sent_tokenize(text)

def combine_wav_files(input_files, output_file):
    data = []

    for file in input_files:
        with wave.open(file, 'rb') as wav_file:
            data.append([wav_file.getparams(), wav_file.readframes(wav_file.getnframes())])

    output_params = data[0][0]

    with wave.open(output_file, 'wb') as output_wav_file:
        output_wav_file.setparams(output_params)
        for params, frames in data:
            output_wav_file.writeframes(frames)
Integrating Azure Storage and Organizing Local Folders
To manage input and output files effectively, we integrate Azure Storage into our solution and create local directories
to store temporary data during processing. You can use any other storage provider you prefer.
Here’s how we set up the Azure Storage connection and organize the local folders:
from azure.storage.blob import ContainerClient
import os

# Create local paths
output_dir = '.data/outputs'
voice_dir = '.data/input_voice'
text_dir = '.data/input_text'

# Create directories if they don't exist
os.makedirs(output_dir, exist_ok=True)
os.makedirs(voice_dir, exist_ok=True)
os.makedirs(text_dir, exist_ok=True)
os.makedirs('.data/tmp', exist_ok=True)

def azure_initiate(result_blob: str, storage_connection_string: str):
    """
    Initialize a connection to an Azure Storage container.
    """
    azure_client = ContainerClient.from_connection_string(
        storage_connection_string, result_blob
    )
    return azure_client

def retrieve_file(container_client, file_name):
    """
    Retrieve a file from an Azure Storage container.
    """
    return container_client.get_blob_client(file_name)
Processing Logic
The inference function orchestrates the entire process of fetching input data from Azure Storage, performing
text-to-speech synthesis and voice cloning, and uploading the resulting audio file back to Azure Storage. Here’s how it
works:
def inference(connection_string: str, input_container_name: str, output_container_name: str, voices_container_name: str, reference_voice: str,  text_file: str = None):
    # authenticate in azure

    input_blob = azure_initiate(input_container_name, connection_string)
    result_blob = azure_initiate(output_container_name, connection_string)
    voices_blob = azure_initiate(voices_container_name, connection_string)

    process_start_time = datetime.datetime.now()

    # start processing

    # Load the data (voice reference and text)
    if text_file not in os.listdir(text_dir):
        # download blob with name text_file from input_container_name
        text = retrieve_file(input_blob, text_file).download_blob().readall()
        with open(f"{text_dir}/{text_file}", "wb") as f:
            f.write(text)
    # read the text file
    with open(f"{text_dir}/{text_file}", "r") as f:
        text = f.read()
    # download reference voice
    voice_local_path = f'{voice_dir}/{reference_voice}'
    if reference_voice not in os.listdir(voice_dir):
        voice = retrieve_file(voices_blob, reference_voice).download_blob()
        with open(f"{voice_local_path}", "wb") as f:
            voice.readinto(f)

    # TTS process:

    tts_req = TTSRequest(text=text, speaker_ref_path=voice_local_path)
    with tempfile.NamedTemporaryFile(suffix=".wav") as wav_tmp:
        if tts_req.speaker_ref_path is None:
            wav_path = "./assets/bria.mp3"
        else:
            # TODO: fix
            wav_path = tts_req.speaker_ref_path

        if wav_path is None:
            warnings.warn("Running without speaker reference")
            assert tts_req.guidance is None
        if len(tts_req.text.split()) > 10:
            sentences = split_into_sentences(tts_req.text)
            list_of_wav_out = []
            for sentence in sentences:
                wav_out_path = GlobalState.tts.synthesise(
                    text=sentence,
                    spk_ref_path=wav_path,
                    top_p=tts_req.top_p,
                    guidance_scale=tts_req.guidance,
                )
                list_of_wav_out.append(wav_out_path)
            wav_out_path = "." + text_file.split(".")[1] + "_" + reference_voice.split(".")[0] + "_meta" + ".wav"
            combine_wav_files(list_of_wav_out, wav_out_path)
        else:
            wav_out_path = GlobalState.tts.synthesise(
                text=tts_req.text,
                spk_ref_path=wav_path,
                top_p=tts_req.top_p,
                guidance_scale=tts_req.guidance,
            )
    # save result to azure
    end_time = datetime.datetime.now()
    result_file_name = text_file.split(".")[0] + "_" + reference_voice.split(".")[0] + "_meta" + ".wav"
    output_blob_client = result_blob.get_blob_client(result_file_name)
    # upload wav file from local path to blob
    with open(wav_out_path, "rb") as bytes_data:
        output_blob_client.upload_blob(bytes_data, overwrite=True)

    return {"status": "success", "result saved to": f"{output_container_name}/{result_file_name}", "processing time": str(end_time - process_start_time)}
uvicorn main:app --host 0.0.0.0 --port 8000
http://localhost:8000/docs to test your endpoints.
By testing locally with Uvicorn, we can ensure our FastAPI application is ready for deployment and can smoothly
transition to a cloud environment.
Containerizing the FastAPI Application with Docker
After thoroughly testing our FastAPI application, the next step is to containerize it using Docker. This ensures that
our application can be deployed reliably in the cloud. MetaVoice provides a Dockerfile that uses the
nvidia/cuda:12.1.0-devel-ubuntu22.04 base image, which is compatible with MetaVoice’s requirements.
The Dockerfile sets up the necessary environment variables for NVIDIA compatibility, installs essential packages, and
sets the working directory to /app. It also copies the application code into the container and installs specific
versions of PyTorch, torchaudio, and other required Python packages. Additionally, it downloads the AzCopy tool for
efficient data transfer to and from Azure storage.
Here is the Dockerfile:
FROM nvidia/cuda:11.7.1-devel-ubuntu22.04 as cuda-base
# Set some environment variable for better NVIDIA compatibility
ENV PATH=/usr/local/nvidia/bin:/usr/local/cuda/bin:${PATH}
ENV LD_LIBRARY_PATH=/usr/local/nvidia/lib:/usr/local/nvidia/lib64
ENV NVIDIA_VISIBLE_DEVICES=all
ENV NVIDIA_DRIVER_CAPABILITIES=compute,utility

ENV DEBIAN_FRONTEND=noninteractive

# Set the working directory to /app
WORKDIR /app
# Copy the inference folder to /app/inference
COPY /inference /app/inference

# Install curl and add the NodeSource repositories
RUN apt-get update && apt-get install -y software-properties-common
RUN add-apt-repository ppa:deadsnakes/ppa
RUN apt-get update && apt-get install -y python3.9
RUN apt-get update && apt-get install -y curl wget ffmpeg unzip git python3-pip
# Update pip and install requirements
RUN pip install --upgrade pip
RUN pip install torch==1.13.1+cu117 torchvision>=0.13.1+cu117 torchaudio>=0.13.1+cu117 --extra-index-url https://download.pytorch.org/whl/cu117 --no-cache-dir
RUN pip install  -r inference/requirements.txt
RUN pip install uvicorn

# Download AzCopy
RUN wget -O azcopy.tar.gz https://aka.ms/downloadazcopy-v10-linux && tar -xf azcopy.tar.gz --strip-components=1

# Move AzCopy to the /usr/bin directory
RUN mv azcopy /usr/bin/

WORKDIR /app/inference
# Download the cloning model
RUN wget https://myshell-public-repo-hosting.s3.amazonaws.com/checkpoints_1226.zip && \
    unzip -o checkpoints_1226.zip && \
    rm -r checkpoints_1226.zip

CMD ["uvicorn", "fast:app", "--host", "::", "--port", "80"]
Deploying Solution to Salad
We’ve reached the final and most exciting stage of our project: deploying our solution to SaladCloud. If you’re not
making any additional customizations, you can directly proceed to this step.
Deploying your containerized FastAPI application to SaladCloud’s GPU Cloud is a very efficient and cost-effective way to
run your text-to-speech solutions. Here’s how to deploy the solution using the SaladCloud portal:
- Create an Account: Sign up for an account on SaladCloud’s Portal if you haven’t
already.
- Create an Organization: Once logged in, set up your organization within the SaladCloud platform to manage your
deployments and resources.
- Deploy Container Group: Go to the “Container Groups” section in the SaladCloud portal and select “Deploy a
Container Group” to begin deploying your FastAPI application to SaladCloud’s infrastructure.
 We now need to set up all of our container group parameters:
Configure Container Group:
We now need to set up all of our container group parameters:
Configure Container Group:
- Create a unique name for your Container group
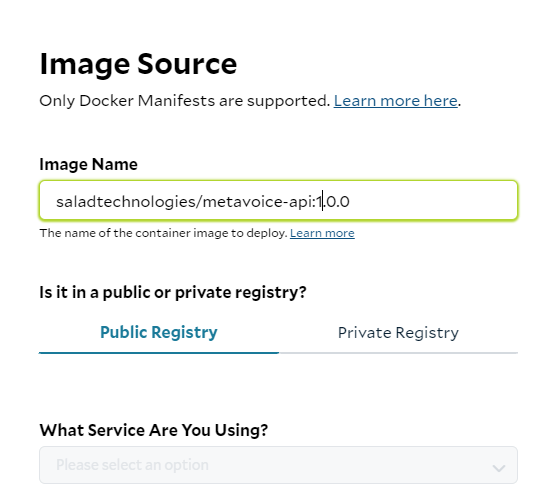
- Pick the Image Source: In our case we are using a public SaladCloud registry. Click Edit next to Image source.
Under image name paste the image path: saladtechnologies/metavoice-api:1.0.0 If you are using your custom
solution, specify your image location.
- Replica count: It is recommended to use 3 or more replicas for production. We will use just 1 for testing.
- Pick compute resources: Pick how much cpu, ram and gpu you want to allocate to your process. MetaVoice
documentation specifies that the models needs at least 12GB GPU RAM. Checkout our benchmark to see what GPU version
best suites your needs.
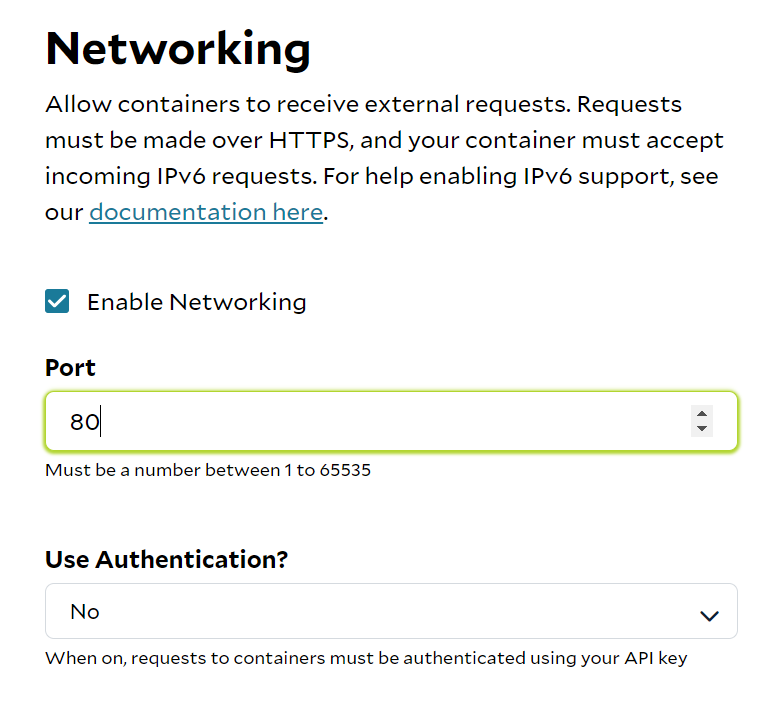
- Networking. Click “Edit“ next to it, check “Enable Networking“ and set port to 80:
- Optional Settings: SaladCloud gives you some great options like health check probe, external logging and passing
environment variables.
- Update Command We have not updated MetaVoice’s Entrypoint in the Dockerfile, so we will need to override it under
“Command”. We need to change our command to uvicorn fast:app and add a few arguments: —host :: —port 80.
This will make sure our endpoint is accessible with IPv6 and port 80:
 Additionally, for enhanced security, you have the option to enable Authentication under networking. When activated,
you’ll need to include your personal token with each API call. You can locate your token here:
https://portal.salad.com/api-key
With all configurations complete, deploying your FastAPI application on SaladCloud is a straightforward process.
Leveraging SaladCloud’s platform ensures that your text-to-speech API operates on a robust infrastructure capable of
handling demanding tasks cost-effectively.
Finally, ensure the “AutoStart container group once the image is pulled” option is checked, then click “Deploy”. With
that, we’re ready to go. Let’s wait for our solution to deploy and then proceed with testing.
Additionally, for enhanced security, you have the option to enable Authentication under networking. When activated,
you’ll need to include your personal token with each API call. You can locate your token here:
https://portal.salad.com/api-key
With all configurations complete, deploying your FastAPI application on SaladCloud is a straightforward process.
Leveraging SaladCloud’s platform ensures that your text-to-speech API operates on a robust infrastructure capable of
handling demanding tasks cost-effectively.
Finally, ensure the “AutoStart container group once the image is pulled” option is checked, then click “Deploy”. With
that, we’re ready to go. Let’s wait for our solution to deploy and then proceed with testing.
Advantages of Selecting Salad:
- Cost-Efficiency: SaladCloud’s GPU cloud services are priced favorably when compared to other cloud providers,
allowing you to leverage additional resources for your application while minimizing expenses.
- Intuitive Platform: SaladCloud emphasizes a seamless user experience, providing an easy-to-navigate interface that
streamlines the deployment and management of applications in the cloud.
- Robust Documentation and Support: SaladCloud furnishes detailed documentation to facilitate deployment,
configuration, and problem-solving, supported by a committed team available to provide assistance as needed.
Test Full Solution deployed to Salad
Once your solution is deployed on Salad, the next step is to interact with your FastAPI application using its public
endpoint. SaladCloud provides you with a deployment URL, which allows you to send requests to your API using
SaladCloud’s infrastructure, just as you would locally.
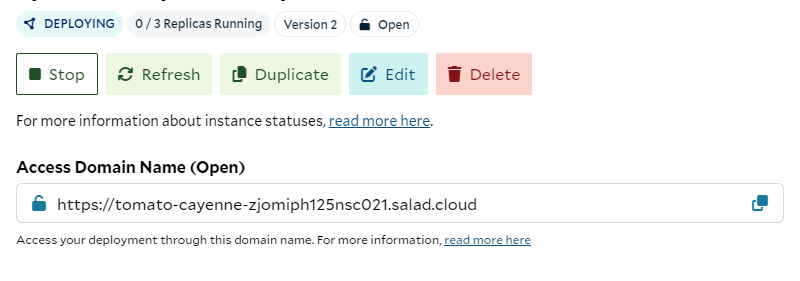 You can use this URL to access your FastAPI application’s Swagger page, which is now hosted in the cloud. Replace
localhost in your local URL with the provided deployment URL to access the Swagger page. For example:
https://tomato-cayenne-zjomiph125nsc021.salad.cloud/docs
You will see your Swagger page similar to this:
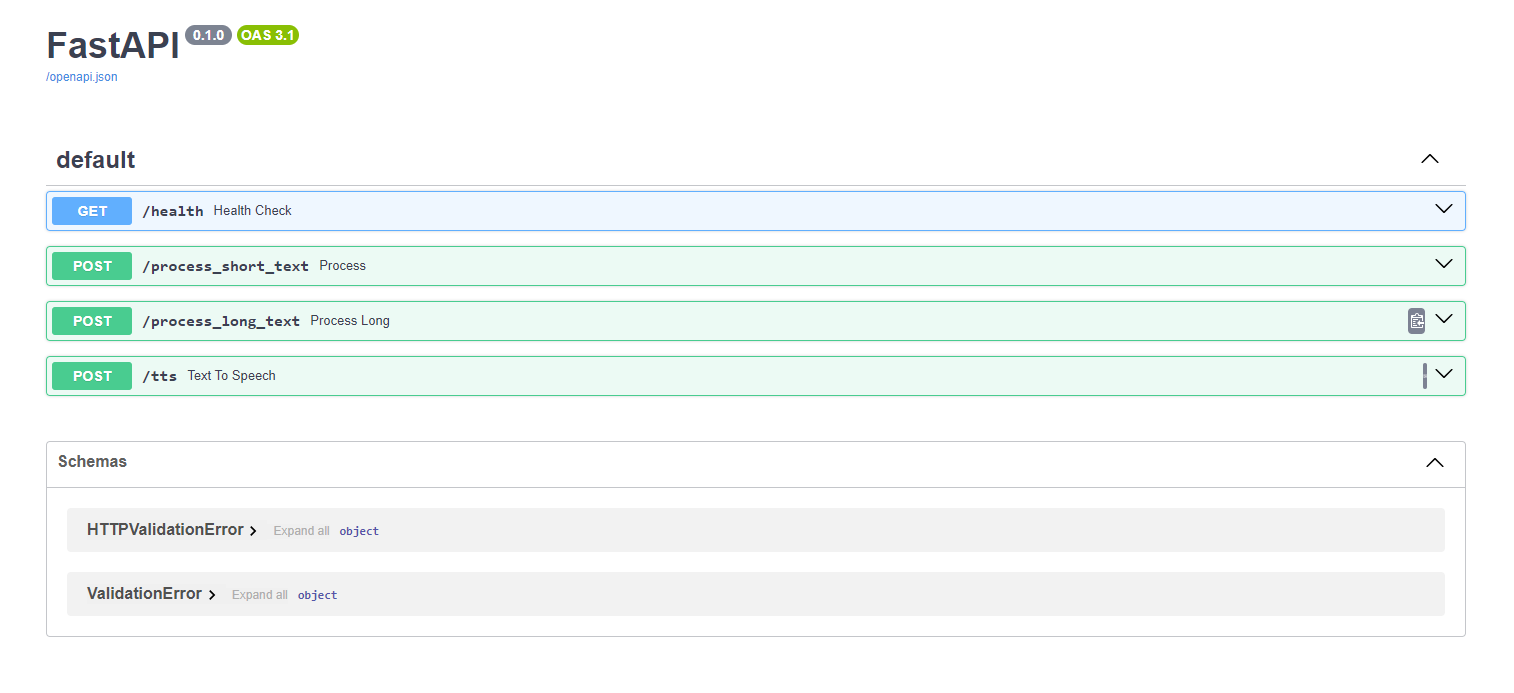 On the Swagger page, you have the ability to engage with your API by supplying the necessary parameters to initiate the
process. Certain parameters are optional, and it may not be necessary to modify them if you’re utilizing the default
Azure container names. It’s important to mention that this solution relies on Azure storage, so ensure that your Azure
resources are set up beforehand. If you’re considering using a different storage provider, refer to the comprehensive
solution documentation for guidance. The complete list of arguments has been provided earlier in the document.
You can now use your endpoint with Swagger to interact with your API directly through the browser. Alternatively, you
can send requests to your endpoint using tools like curl or Postman for testing and integration into your applications.
Enjoy leveraging the power of MetaVoice and SaladCloud for your text-to-speech and voice cloning needs!
On the Swagger page, you have the ability to engage with your API by supplying the necessary parameters to initiate the
process. Certain parameters are optional, and it may not be necessary to modify them if you’re utilizing the default
Azure container names. It’s important to mention that this solution relies on Azure storage, so ensure that your Azure
resources are set up beforehand. If you’re considering using a different storage provider, refer to the comprehensive
solution documentation for guidance. The complete list of arguments has been provided earlier in the document.
You can now use your endpoint with Swagger to interact with your API directly through the browser. Alternatively, you
can send requests to your endpoint using tools like curl or Postman for testing and integration into your applications.
Enjoy leveraging the power of MetaVoice and SaladCloud for your text-to-speech and voice cloning needs!